C# Onvif IP Camera Viewer NuGet package
With Onvif IP Camera Viewer, you have the opportunity to access USB, Real Time Streaming Protocol (RTSP) and Onvif IP cameras. You are free to develop camera viewer applications that are capable of detecting motion, query and set image settings, use Pan-Tilt-Zoom (PTZ) control over the camera, create server mode to stream IP camera video to the connected clients, implement Voice Over IP (VoIP) Session Initiation Protocol (SIP) alarm call and more. Only NuGet is essential to start developing your very own applications. This guide helps you to start and to build your camera project efficiently.
Download example from nuget.org: https://www.nuget.org/packages/Onvif.IP.Camera.Viewer/
Prerequisites
- Visual Studio 2010 or newer
- .NET Framework 4
- An USB, RTSP or Onvif Camera to connect with
What is NuGet and why is it useful?
NuGet is a free, easy to use and open source package manager for the .NET Framework and it is distributed as a Visual Studio extension. The NuGet client tools provide the ability to produce and consume packages. It has a central package repository which can be used by all the package authors and consumers. So if you use the NuGet package manager you will be able to get the latest version of the package what is important to you.
Install NuGet Package Manager
With Installing the NuGet Package Manager, you can download and easily update the project (Camera SDK and the corresponding sample program). The NuGet is available for Visual Studio 2010, 2012 and 2013.
Install into Visual Studio 2010:
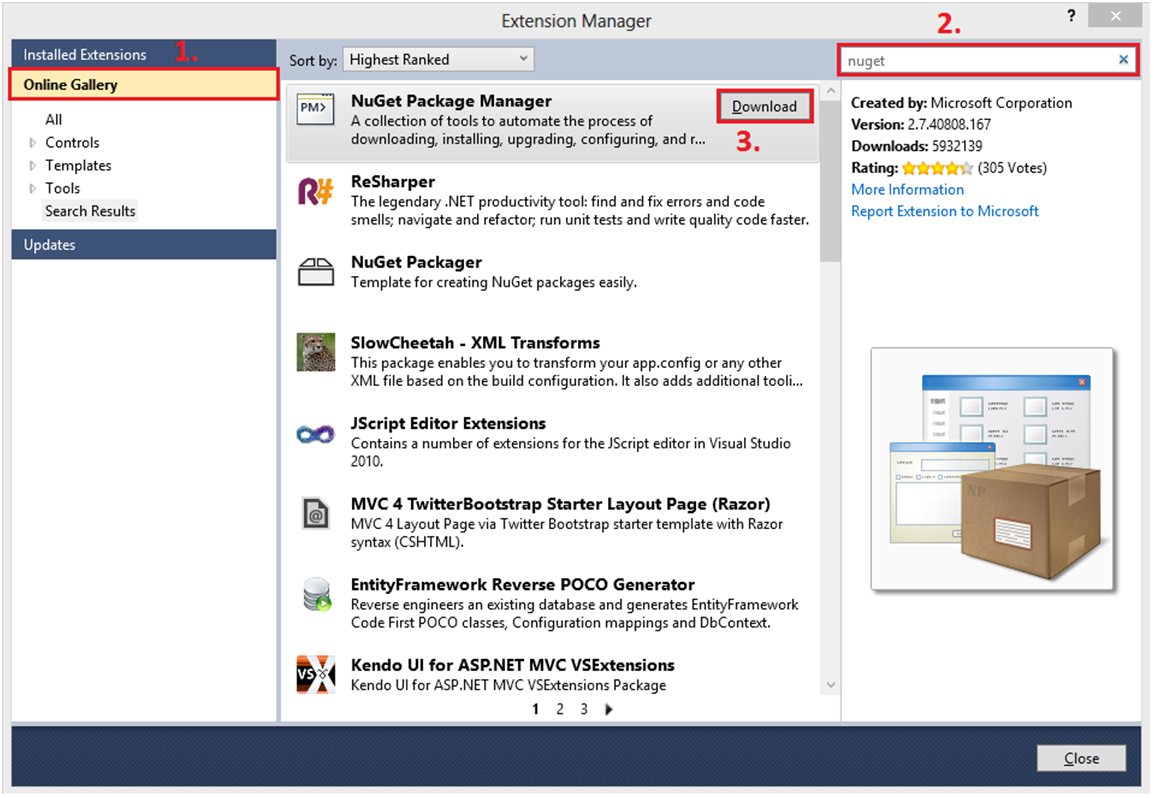
An extension can be installed to the Professional, Premium, and Ultimate editions. First of all select the 'Tools' menu and 'Extension Manager.' (or Extensions and Updates...). In Extension Manager select Online Gallery, and click to the 'Search Online Gallery' field in the upper right corner. Then type in the NuGet word. After finding the 'NuGet Package Manager' extension, click to the 'Download' button next to it, and follow the installation steps (Figure 1).

Install into Visual Studio 2012:
The NuGet is included in every edition (except Team Foundation Server) by default. Updates of NuGet can be found through the Extension Manager.
You can check whether your copy of Visual Studio already has the NuGet extension, look for Library Package Manager in the Tools menu of Visual Studio.
If your copy of Visual Studio does not have the Library Package Manager (NuGet) extension yet, you can install it by using the Extension Manager.
Download project
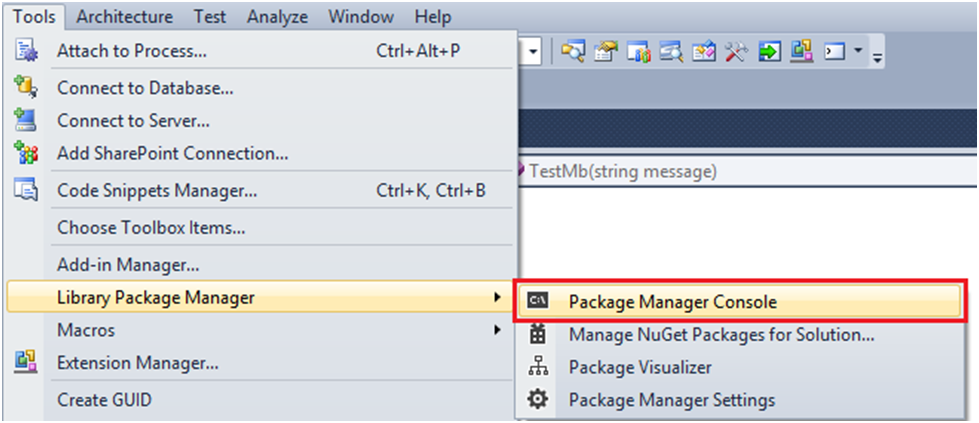
After you have installed the NuGet Package Manager, you can download the project by Package Manager Console. Select the 'Tools' menu -> 'Library Package Manager' (or NuGet Package Manager) -> 'Package Manager Console' (Figure 2).

In the Package Manager Console execute the following command:
Install-Package Onvif.IP.Camera.Viewer

In the Solution Explorer, you can see the added new Camera SDK Reference, and the added class files (Program.cs, Form1.cs, Form1.Designer.cs).
Write the example
You have downloaded, and installed the project. For managing Onvifcamera connection you can check the files of the Onvif.IP.Camera.Viewer. In the Program.cs the Main method is a standard Windows Form Main with default settings and running of the GUI.
static void Main()
{
    Application.EnableVisualStyles();
    Application.SetCompatibleTextRenderingDefault(false);
    Application.Run(new Form1());
}
In the constructor of the Form1.cs there is a InitializeComponent() method call for initializing the GUI components of the source code like the connect button (connectBtn) and video display panel (panel1). In the other lines of this constructor there is an initialization of a VideoViewerWF, the setting of the connection between the panel and the video viewer and the setting of the image provider.
public Form1()
{
    InitializeComponent();

    // Create video viewer UI control
    _videoViewerWF1 = new VideoViewerWF();
    _videoViewerWF1.Name = "videoViewerWF1";
    _videoViewerWF1.Size = panel1.Size;
    panel1.Controls.Add(_videoViewerWF1);

    // Bind the camera image to the UI control
    _videoViewerWF1.SetImageProvider(_imageProvider);
}
There is a click event of the connect button which is responsible for creating the connection between the application and the camera. The source code includes an IIPCamera object called _camera and we need to equal this to the return value of the IPCameraFactory.GetCamera(). We need to connect the video channel of the camera to the image provider then we can start the camera and the video viewer.
private void connectBtn_Click(object sender, EventArgs e)
{
    _camera=new IPCamera("192.168.112.109:8080","user","qwe123");
    _connector.Connect(_camera.VideoChannel, _imageProvider);
    _camera.Start();
    _videoViewerWF1.Start();
}
Finally there is the Form1 designer code which is respnsible for managing the GUI elements and their events.
			partial class Form1
		    {
		        ///
		        /// Required designer variable.
		        ///
		        private System.ComponentModel.IContainer components = null;

		        ///
		        /// Clean up any resources being used.
		        ///
		        /// true if managed resources should be disposed; otherwise, false.
		        protected override void Dispose(bool disposing)
		        {
		            if (disposing && (components != null))
		            {
		                components.Dispose();
		            }
		            base.Dispose(disposing);
		        }

		        #region Windows Form Designer generated code

		        ///
		        /// Required method for Designer support - do not modify
		        /// the contents of this method with the code editor.
		        ///
		        private void InitializeComponent()
		        {
		            this.connectBtn = new System.Windows.Forms.Button();
		            this.panel1 = new System.Windows.Forms.Panel();
		            this.SuspendLayout();
		            //
		            // connectBtn
		            //
		            this.connectBtn.Location = new System.Drawing.Point(10, 230);
		            this.connectBtn.Name = "connectBtn";
		            this.connectBtn.Size = new System.Drawing.Size(75, 23);
		            this.connectBtn.TabIndex = 2;
		            this.connectBtn.Text = "Connect";
		            this.connectBtn.UseVisualStyleBackColor = true;
		            this.connectBtn.Click += new System.EventHandler(this.connectBtn_Click);
		            //
		            // panel1
		            //
		            this.panel1.BorderStyle = System.Windows.Forms.BorderStyle.FixedSingle;
		            this.panel1.Location = new System.Drawing.Point(10, 10);
		            this.panel1.Name = "panel1";
		            this.panel1.Size = new System.Drawing.Size(250, 210);
		            this.panel1.TabIndex = 3;
		            //
		            // Form1
		            //
		            this.AutoScaleDimensions = new System.Drawing.SizeF(6F, 13F);
		            this.AutoScaleMode = System.Windows.Forms.AutoScaleMode.Font;
		            this.ClientSize = new System.Drawing.Size(274, 264);
		            this.Controls.Add(this.panel1);
		            this.Controls.Add(this.connectBtn);
		            this.Name = "Form1";
		            this.StartPosition = System.Windows.Forms.FormStartPosition.CenterScreen;
		            this.Text = "IP Camera\'s Live Image";
		            this.ResumeLayout(false);

		        }

		        #endregion

		        private System.Windows.Forms.Button connectBtn;
		        private System.Windows.Forms.Panel panel1;
		    }
DISCLAIMER: Please note that the following features will only work if your IP camera supports the given function. You should check the user manual of your IP camera to make sure it supports the feature that you wish to implement in C#.
Related Pages
FAQ
Below you can find the answers for the most frequently asked questions related to this topic:
-
How can I get the URL of the camera?
You can get the URL from the producer of the camera. (In the 10th tutorial you can find information on how to create an own IP camera discoverer program.)
-
I have not managed to build the solution. How to solve it?
- Please set the Target framework property of the project to .NET 4.0.
- You should add the OzekiSDK.dll to the references of the solution.
- Please import the missing classes.
-
Why can not I zoom?
Some cameras does not support it.
-
Why is the camera moving, when I am not using it?
It is possible that someone else is also using the camera.
-
Why cannot I turn the camera in bigger angle than the current?
Because all camera have a limit in rotation.
