How to use the Android SMPP gateway from Ozeki NG
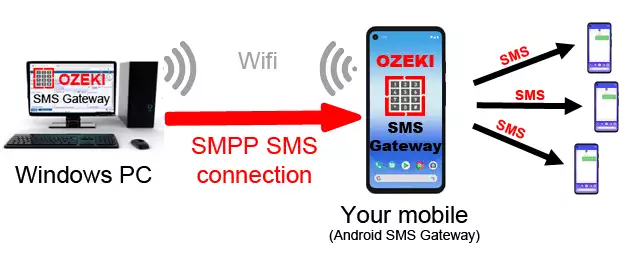
By following the step-by-step guide below you can see how simple it is to install and configure your Ozeki Android SMPP SMS Gateway as an SMS Service Provider.
Installation steps
- What you need
- Establish Internet connection
- Installation of Ozeki Android SMPP Gateway
- Connecting the Ozeki Android SMPP Gateway to a computer
- Settings in the Ozeki Android SMPP Gateway
- Logging in Ozeki NG SMS Gateway
- Configuration in Ozeki NG SMS Gateway
- Send test SMS message from Ozeki NG SMS gateway
What you need
You need to connect Ozeki Android SMPP Gateway and Ozeki NG SMS Gateway to be able to send and receive SMS messages from your system. Furthermore you will need the smarthopne on which you have installed the Ozeki HTTP SMS Gateway with an active SIM card.
- Android Mobile Phone: As the name suggests the Ozeki Android SMPP Gateway runs on mobile phones with android Operating Systems. At least the software requires Android 8.0 and as I earlier mentioned you need a SIM card too, which is used to provide connection to a GSM service provider. You can use your own SIM card or you can buy a new one directly from a GSM service provider.
- Ozeki Android SMPP Gateway Application: It works as a gateway that allows you to send SMS messages from the Ozeki NG SMS Gateway toward the GSM network. You can download the latest version directly from Ozeki.
- Windows PC: The Ozeki NG SMS Gateway is compatible only with Windows operation system. If you want to use it, you will need a Windows PC.
- Ozeki NG SMS Gateway: You can connect your system to the mobile network with Ozeki NG SMS Gateway, moreover you will be able to send and receive SMS messages. You can order it directly from Ozeki.
Establish Internet connection
You will need an active Internet connection on your Android phone. You can use WI-FI or your Mobile Internet subscription. To establish the Internet connection you have to ways:
- WI-FI: Select the Settings menu, then Wireless and networks and finally WI-FI settings. Turn on WI-FI by checking the "WI-FI" in the checklist, then select the appropriate WI-FI network from the available networks list . If necessary, enter the password, then click on the "Connect " button.
- Mobile network: If you have Mobile Internet on your smartphone do the following steps: Select the Settings menu, then Wireless and networks and finally the Mobile networks item. After this click on "Use packet data" in the checklist, with this you have enabled data access over mobile network.
Installation of Ozeki Android SMPP Gateway
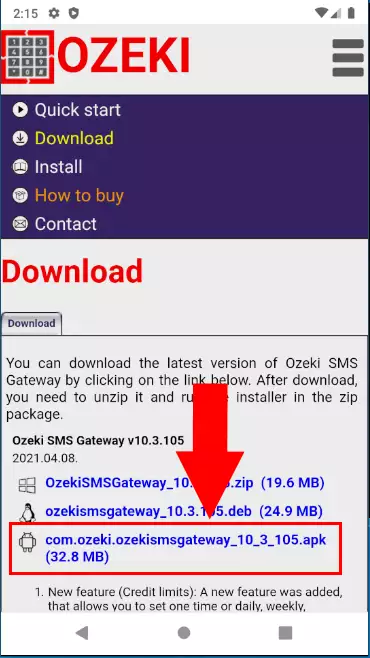
The Android opertion system installs the Ozeki Android SMPP Gateway automatically on your phone right after when its downloaded. (Figure 2):
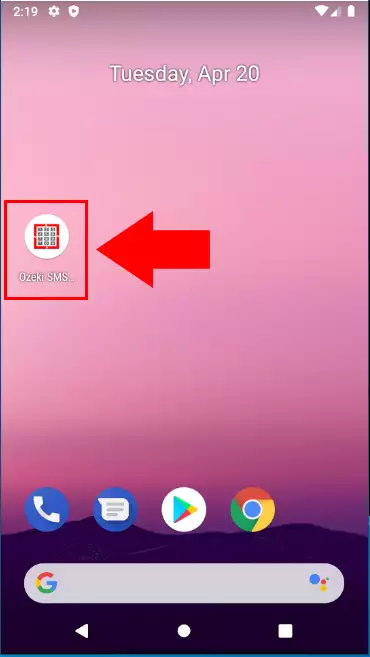
After the application is successfully installed on your phone the icon below will appear on your phone's menu (Figure 3):
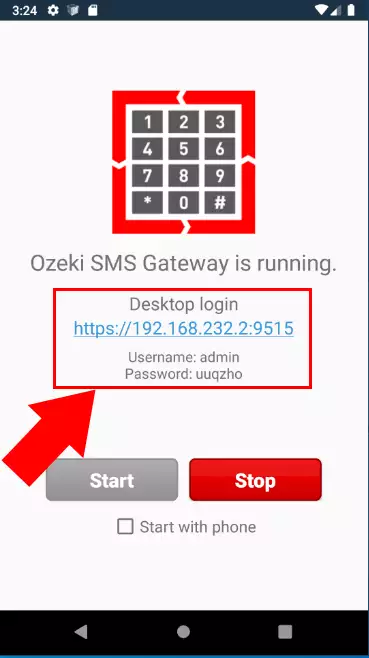
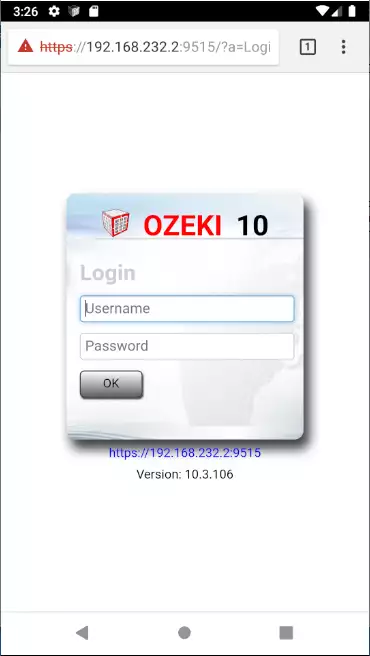
For launching the application you have to click on it's icon. Then the home screen will appear on your phone, which you can see on (Figure 4) below. When the appliaction is started you can see the ip address and port where you can find the Ozeki SMS Gateway User interface. Below it you can find the Username and password for the first login.
If you open the user interface in the browser you will see the Ozeki SMS Gateway login page.
Connecting the Ozeki Android SMPP Gateway to a computer
You can connect the Ozeki Android SMPP Gateway to your computer through the Internet or over WI-FI, so there is no need for any cables to connect your PC with your phone.
Networks settings in Ozeki Android SMPP Gateway
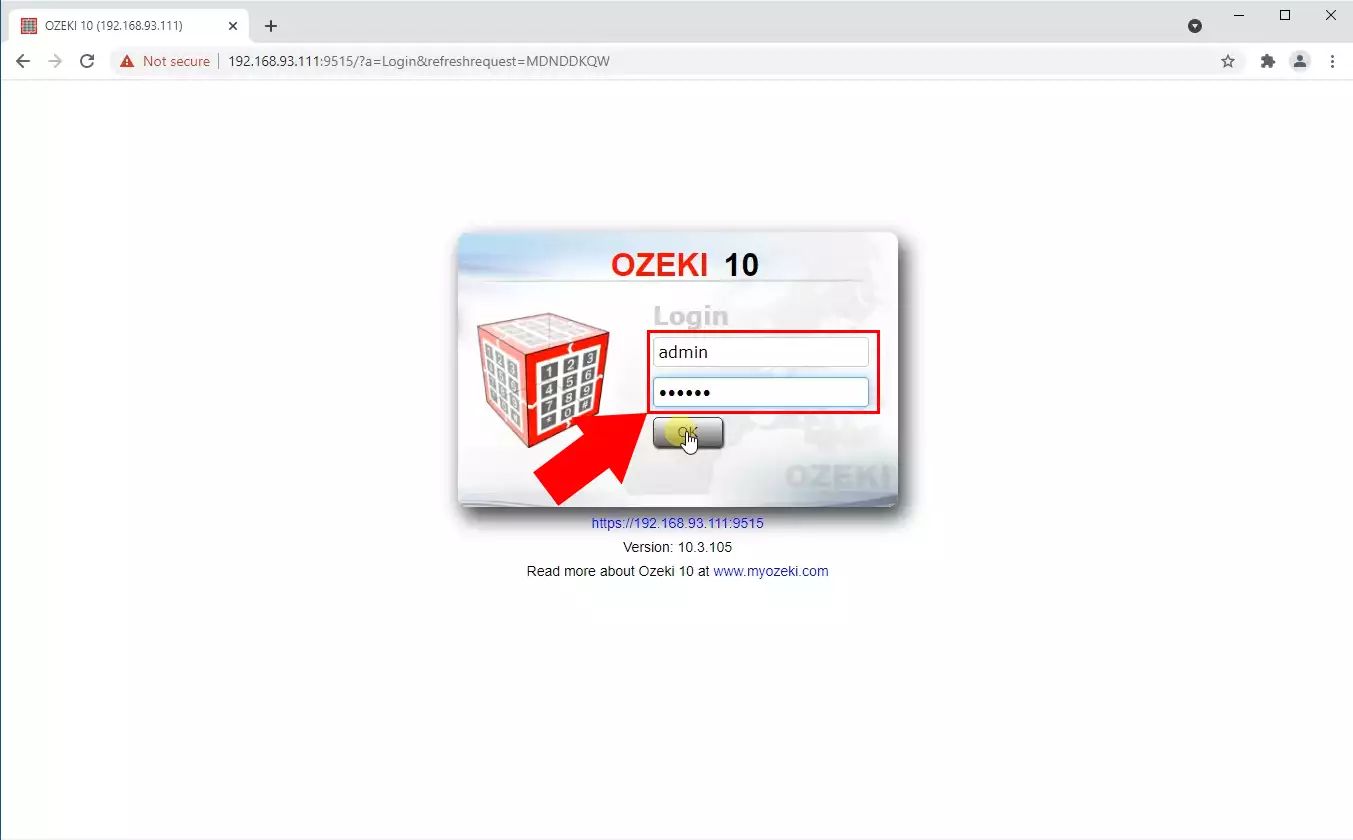
You need to login to the Ozeki SMPP SMS gateway using a web browser as administrator. For configuration we recommend to login using the administrator account. The administrator account username is "admin", and you can find the password in the applications starter page.
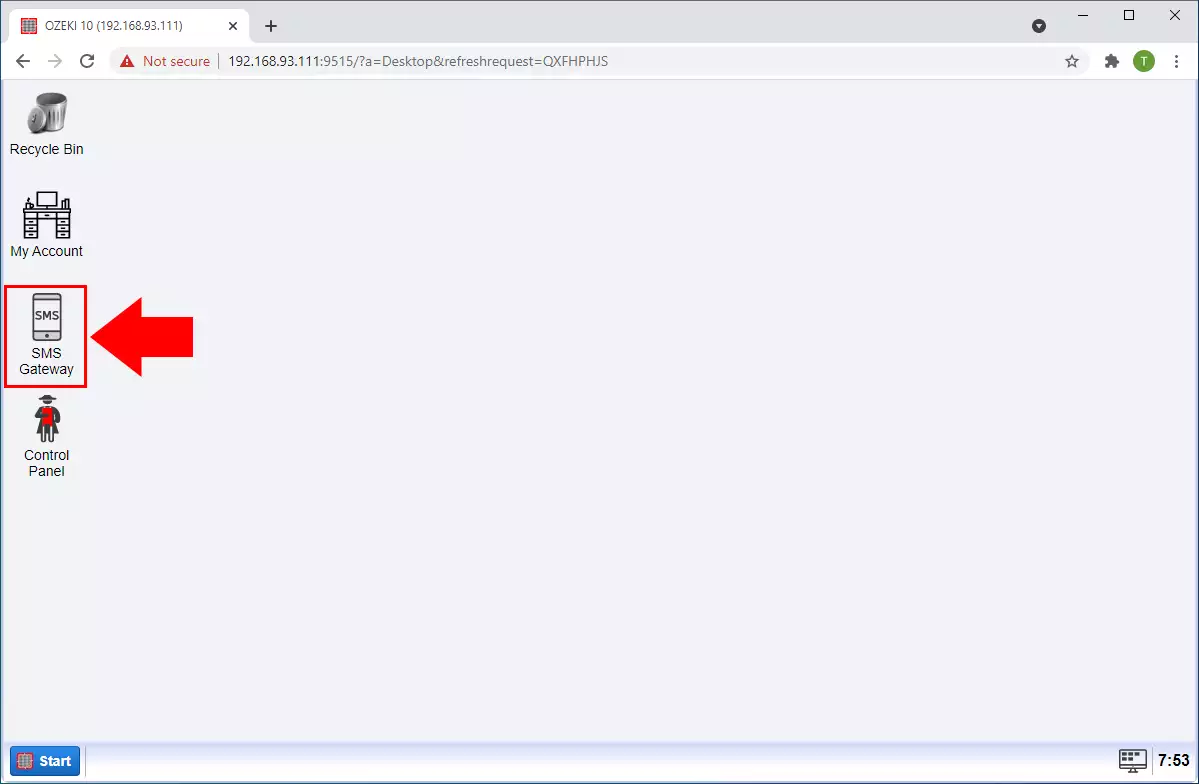
Find the SMS gateway icon on the Ozeki Desktop, and click on it. This will open the SMS gateway app.
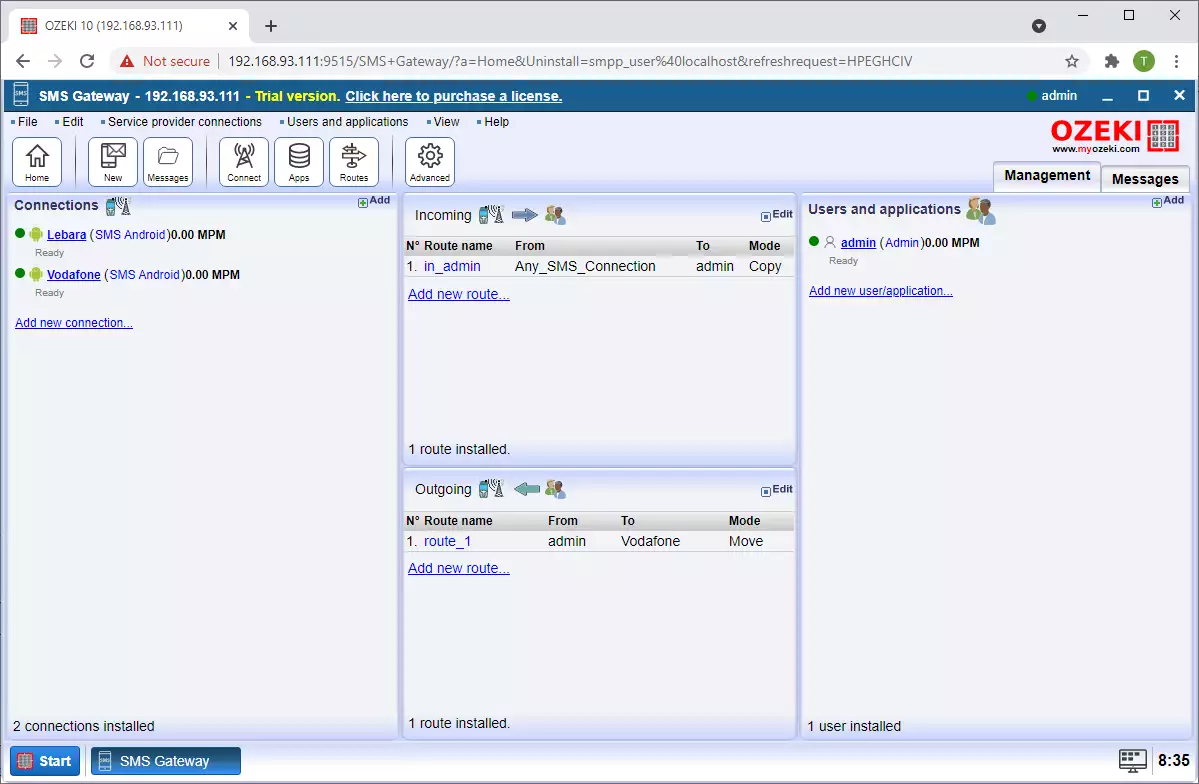
The SMS Gateway starts with an opening window as Figure 8 demonstrates it. Here there are four main panels that collect all the main features of the SMS Gateway you need to handle SMS messages.
To add a new user just select the Add new user/application... or click on the APPS button on the top of the main page. Here you can create a general or a network user, select from numerous application interfaces and also you can create services that can handle the incoming messages. If you follow this guide you will create an SMPP user by selecting the SMPP user.
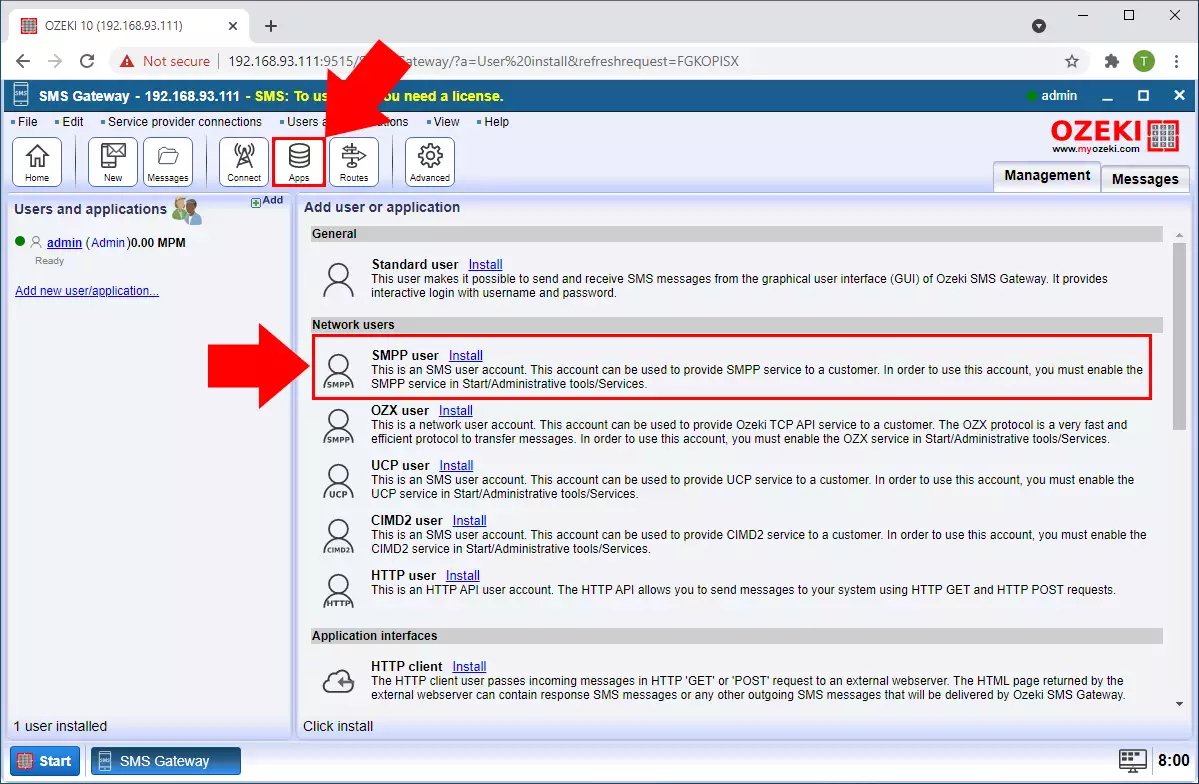
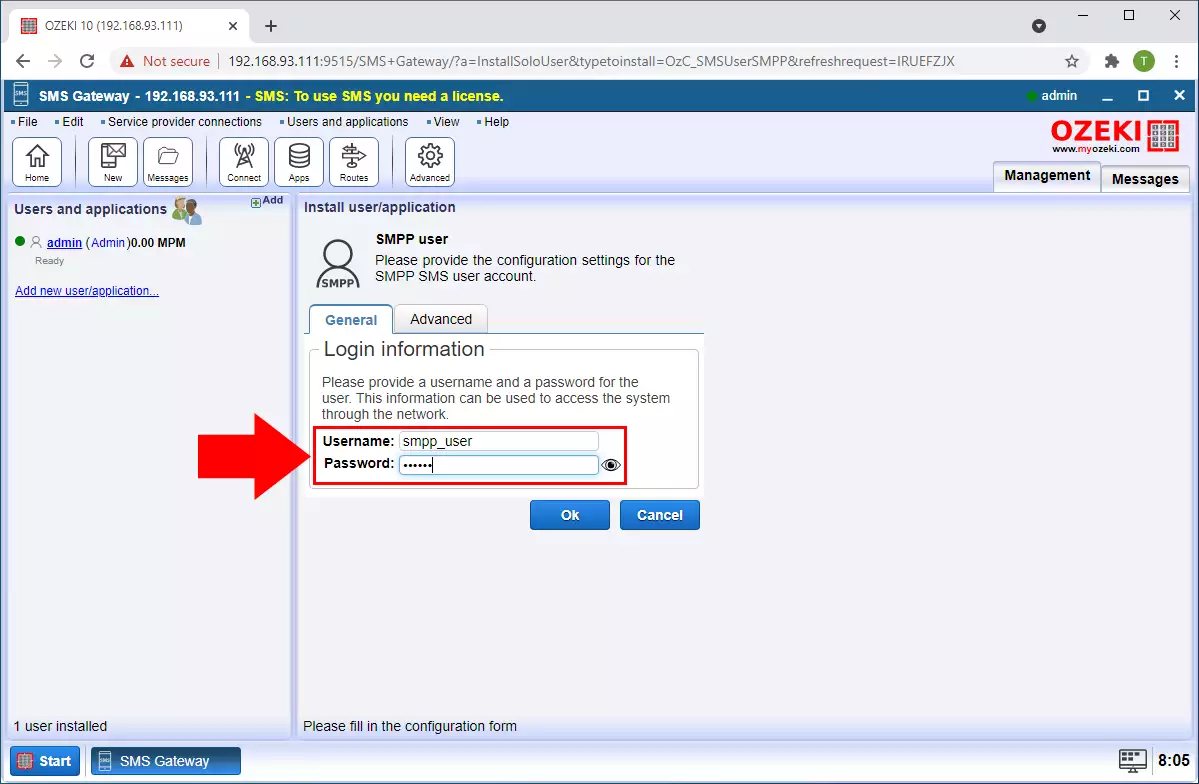
In the installation menu General panel provide the unique username and a password for your SMPP user.
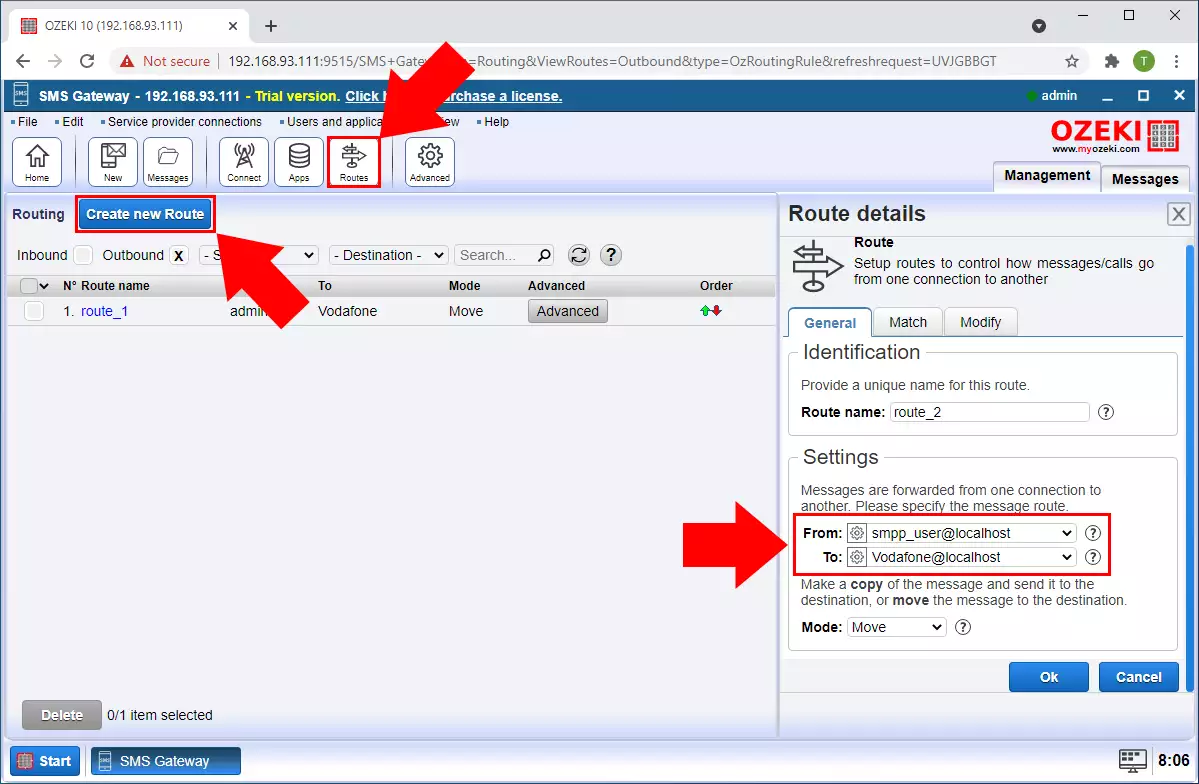
Now You need to add a routing rule by clicking Routes button from the Ozeki SMPP SMS gateway menu. Then in the Settings, for the From connection, select the SMPP user, and for the To connection, select the GSM provider connection from which you want to send the SMS.
Logging in Ozeki NG SMS Gateway
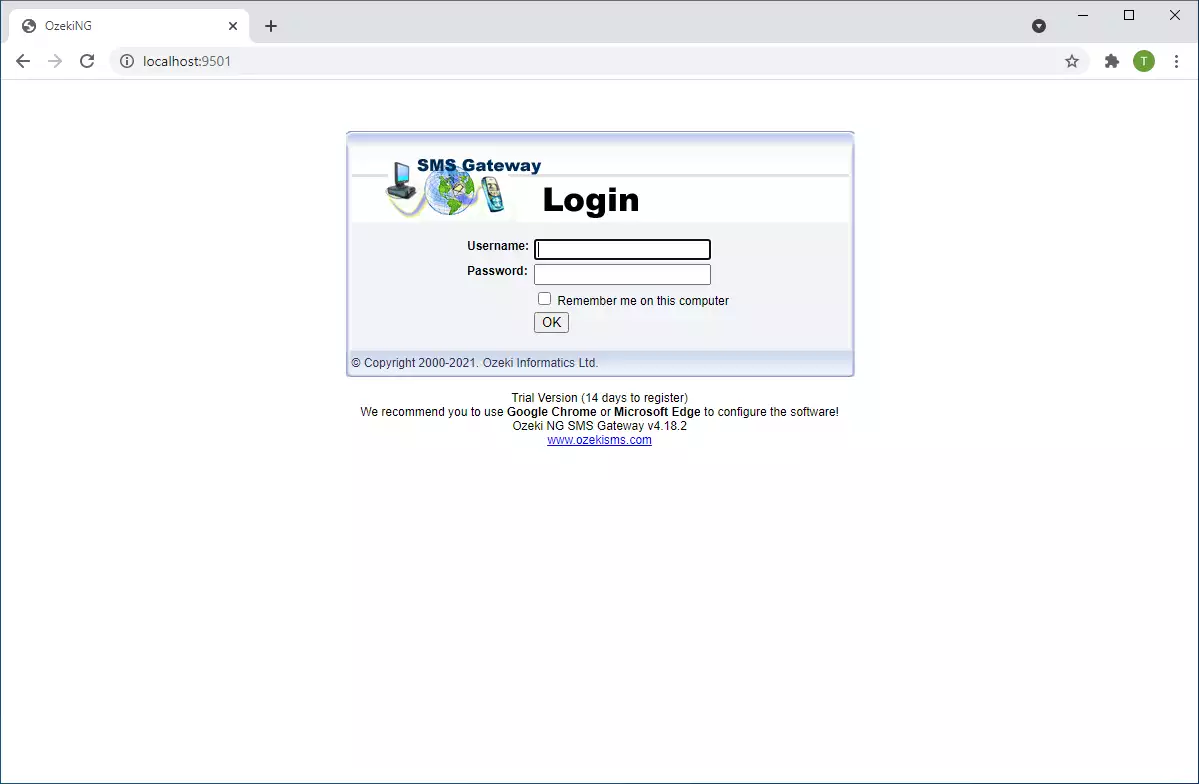
After running Ozeki NG SMS Gateway, the next step is to login. In the login window, you need to enter your username and password (Figure 7). In case you need help for login, visit this page: Ozeki NG SMS Gateway Quick Start Guide.
Configuration in Ozeki NG SMS Gateway
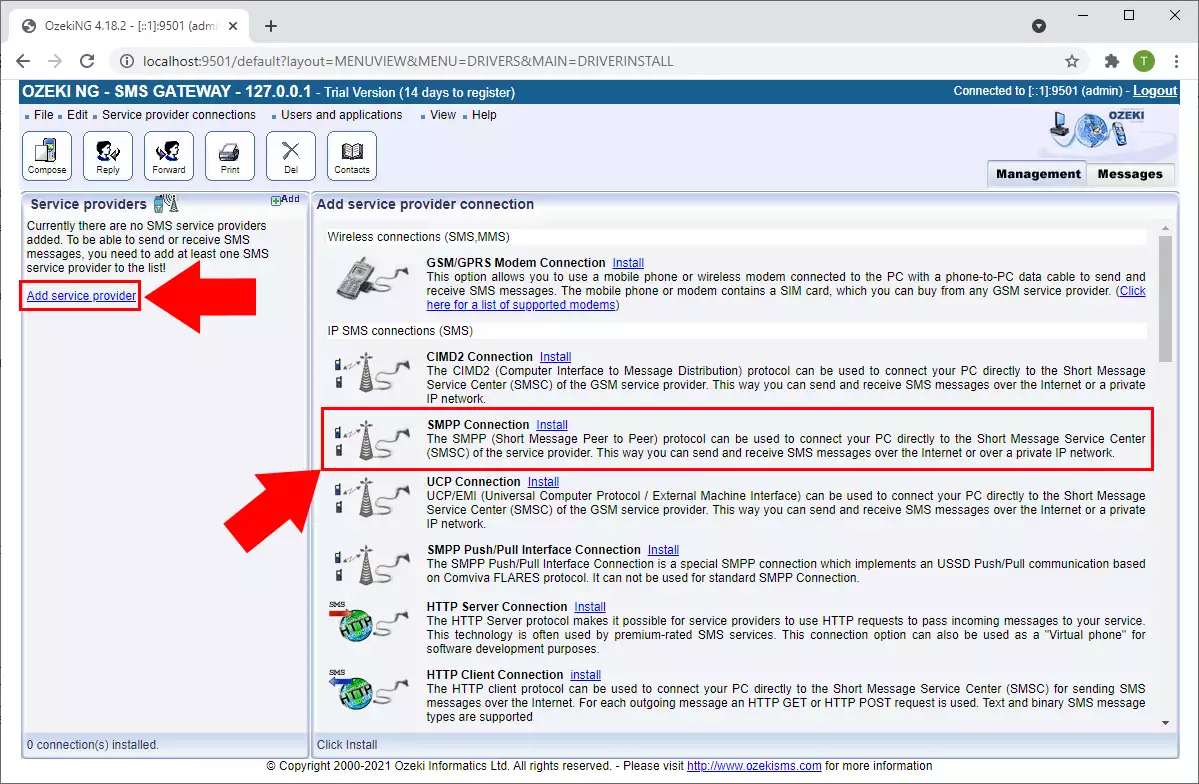
To start installing and configuring an SMPP connection, click the Add button in the top right-hand corner of the Service providers panel on the left of the Management Console interface. (To find out how to open this interface, check out the QuickStart Guide.)
You can also add a service provider connection by clicking the Add service provider item in the Service providers menu.
After you have clicked one of these, the Add service provider panel will show up on the right of the interface. The panel contains a list of protocols you can install and use for communication with an SMS service provider.
To select the SMPP protocol, click the Install link in the respective entry in the list (Figure 13).
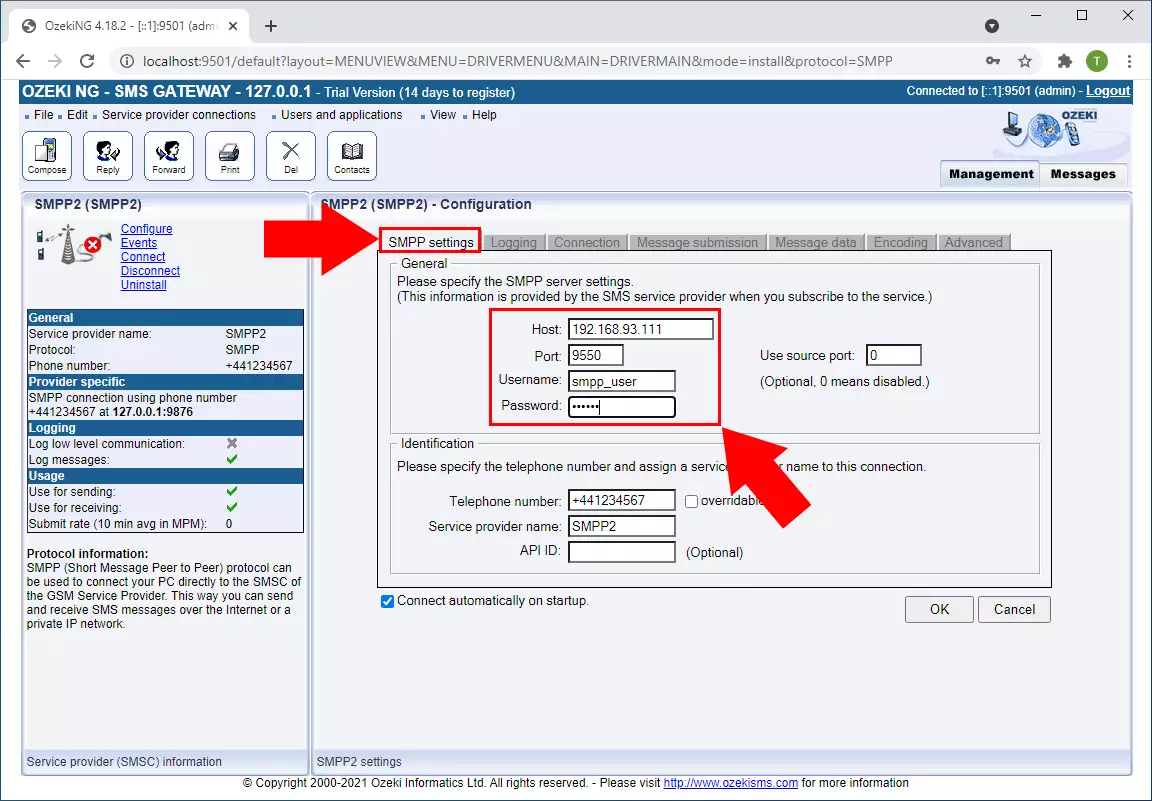
When you have installed the SMPP Connection, the Configuration panel will show up on the right of the interface. The first tab of the panel is the SMPP settings tab. First, specify the SMPP server settings. Check it out from your Ozeki Android SMPP Gateway. The connection parameters are the host name, the port number, a username and a password. Enter the information in the respective edit boxes.
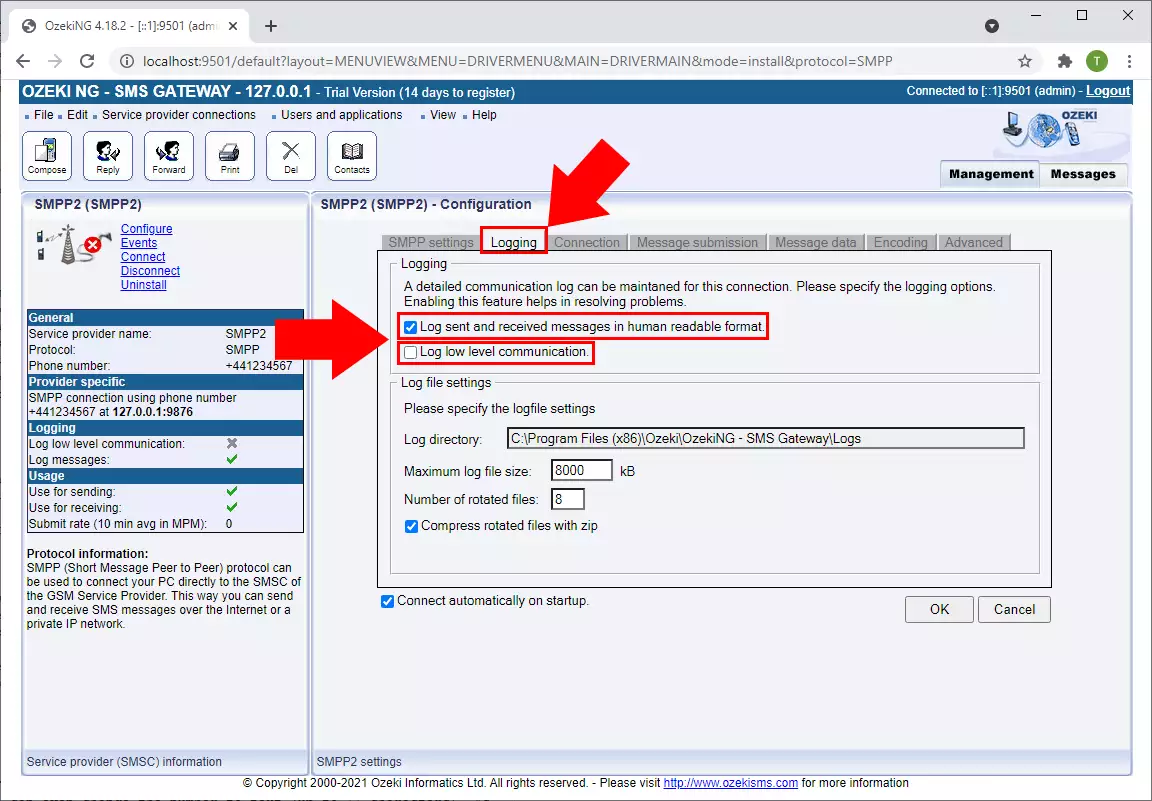
To configure logging, click the Logging tab in the Configuration panel. The tab has a Logging and a Log file settings section. Here, you can choose whether to make the program write log entries about sent and received messages in human readable format and/or log low level communication. Choosing the latter option will make the program produce logfiles containing binary codes representing the communication data. You should check at least the Log sent and received messages in human readable format checkbox, as logfiles can be useful in debugging communication problems.
After you are finished with the configuration click on "OK" button. If you have ticked the Connect automatically on startup checkbox in the Info tab in the bottom left corner of the panel, Ozeki NG SMS Gateway will automatically initiate a connection with the SMSC. If this checkbox is not ticked, you will need to initiate the connection manually.
Click on the Connect link in the left side of the screen to initiate the connection manually (Figure 16).
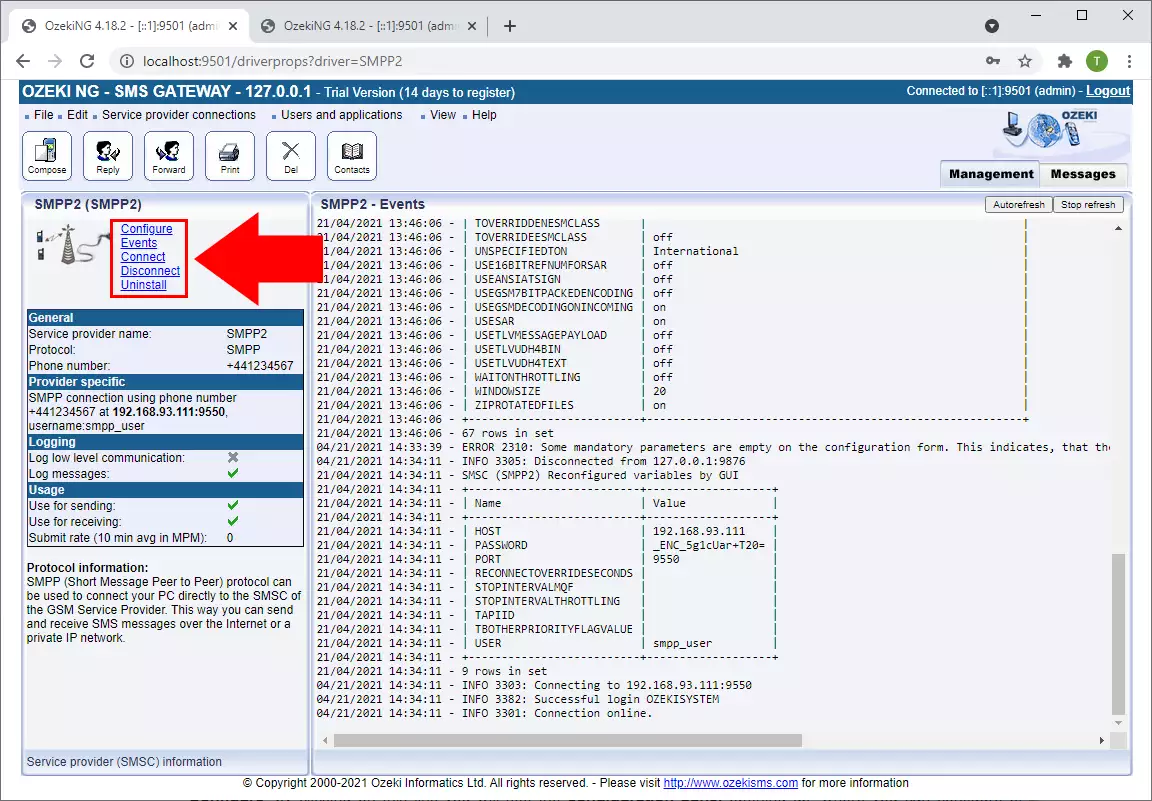
In the Management Console click on the name of a service provider connection to open the panel of the service provider connection.
The panel of the service provider connection consists of three sections.
The name of the service provider connection is on the top. The name of
its protocol is in brackets. An icon shows the status of the service
provider connection. If you see the icon marked with "X" it means, it
is not connected.
To the right of this icon you can find textlinks to perform different operations.
Configure: by clicking on this link you will see the congiguration
panel opening up, where you can configure or modify the settings of an
installed service provide connection.
Events: click on this link to bring up the Events panel, there you
can view the logging of the server provider connection.
Connect: click on it to connect the service provider connection manually
with the SMS Center.
Disconnect: click on it to disconnect the service provider connection
from the SMS Center.
Uninstall: this option allows you to uninstall the service provider
connection.
In the middle panel of the selected service provider connection you can see some important configuration information. The options checked with a tick , have been (re)activated during the configuration. Those with a "X" have not been activated or were deactivated during the configuration. You can find some protocol information at the bottom of this panel.
Send test SMS message from Ozeki NG SMS gateway
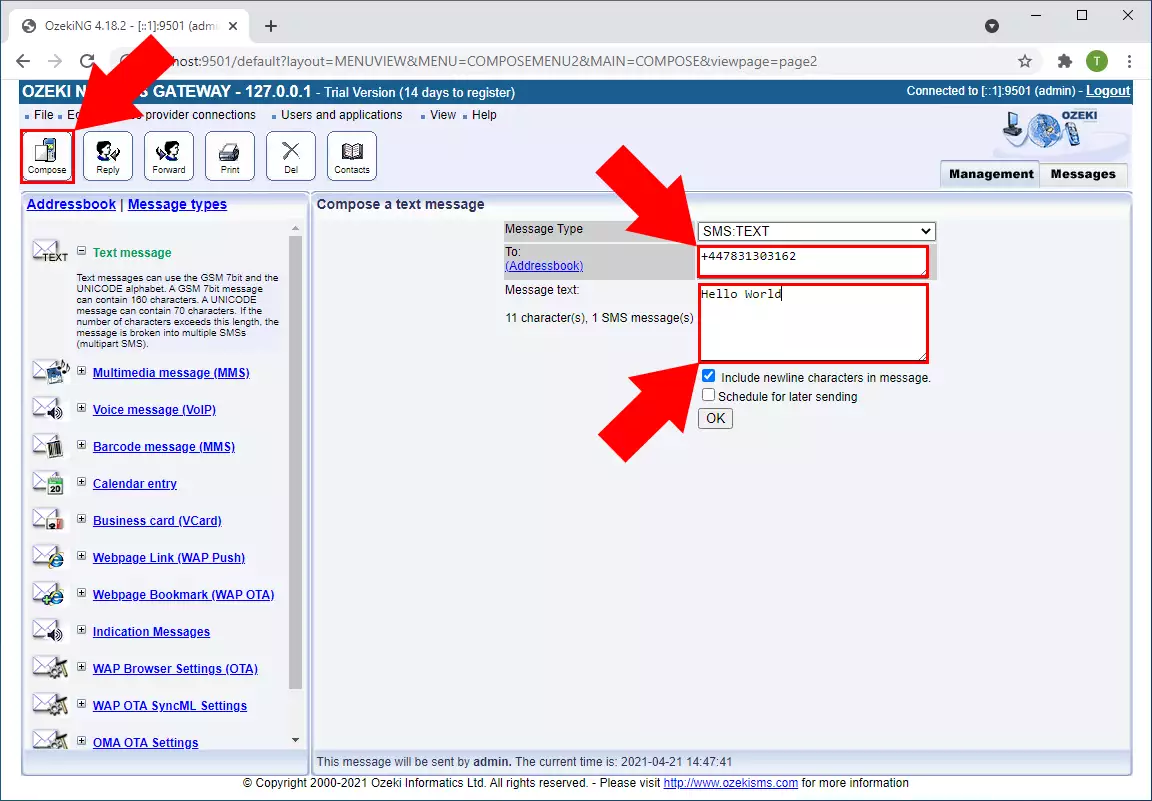
Now with the previous steps you prepared to send and receive SMS messages with Ozeki NG SMS Gateway and in that last step you can write and send your first SMS using the Android SMPP Gateway. So, to enter the Message composer just click on the Compose icon. Here in Message composer specified the address that you have to enter in the To field. In the Message text field just type the message and if you click on OK you just sent your first SMS message using Ozeki NG SMS Gateway.
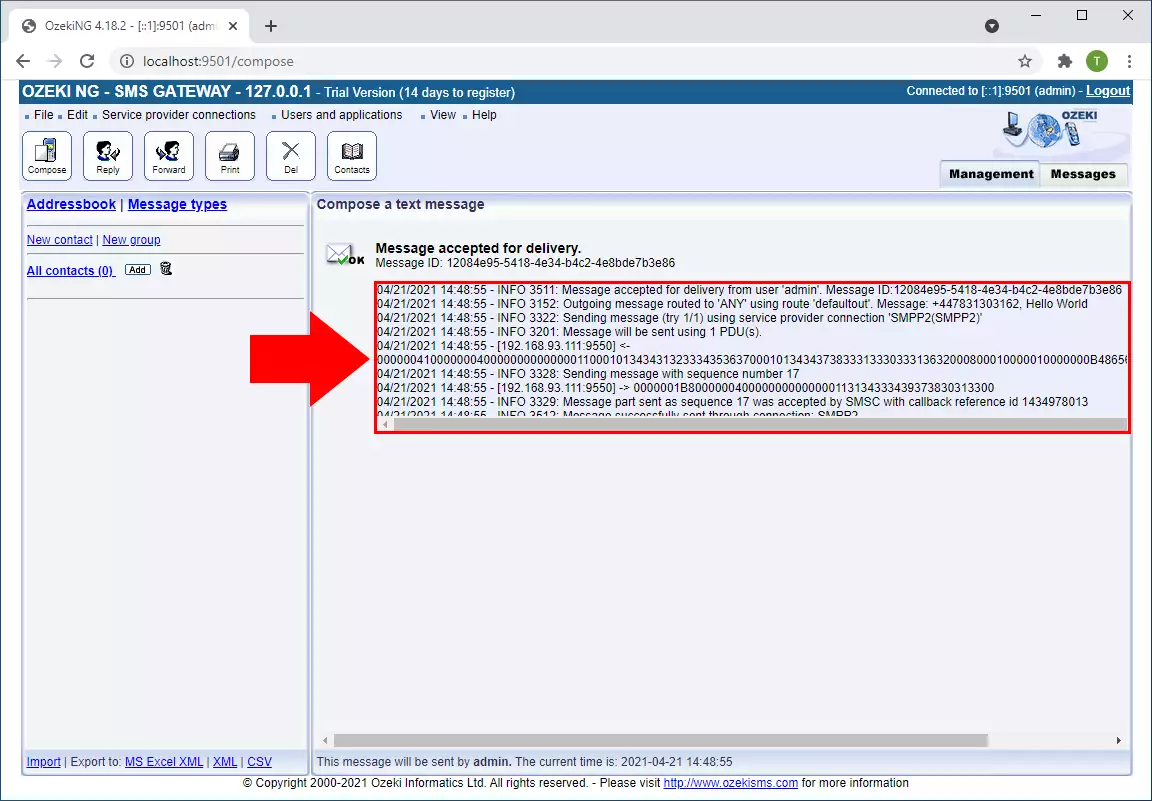
Now you are able to send bulk SMS messages from your Android mobile phone. For more information about sending new messages, please visit Ozeki NG SMS Gateway Quick Start Quide.
Conclusion
This guide above shows how to setup Ozeki Android SMPP Gateway for Ozeki NG SMS Gateway. If you follow these steps you will be able to establish connection between the GSM network and the IP network quickly and easily.
If you have any questions or need assistance, please contact us at info @ozekisms.com

 Sign in