Brightness Filter
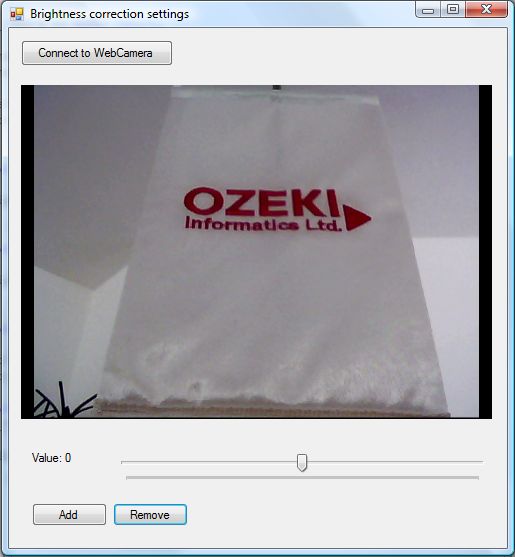
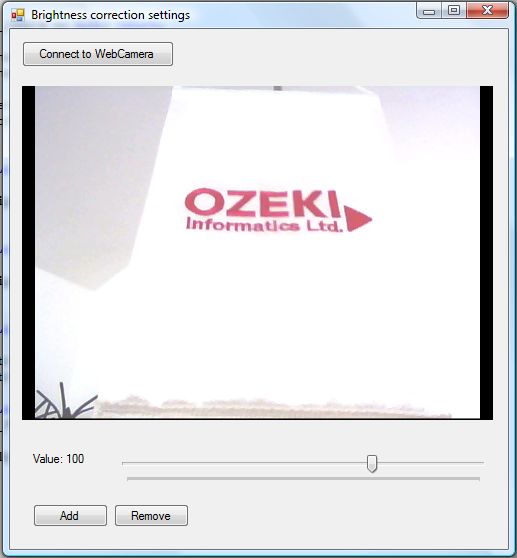
Image brightness is the measure of intensity of an image. The lower the brightness value of the image, the darker it is. If we make the brightness higher, the image will become more whiter. This makes brightness control ideal to compensate images where the light is constantly changing (e. g. a window is involved or something shades the camera).
Important: you should study this article in order to find out how to setup your Windows Forms Application correctly.
Properties
AdjustValue: An integer type value. With this we can set the value of the brightness. The selected value has to be in a range of -255 and 255 and it must be an integer with -255 representing the full black screen and 255 representing the full white one. The less you set the value, the darker the image will become, although the higher you set it, the brighter the image gets and the shinier the display becomes.


| Windows Form |
Windows forms version
MainForm.cs
using System;
using System.Windows.Forms;
using Ozeki.Camera;
using Ozeki.Media;

namespace ImageManipulation_WF
{
    public partial class MainForm : Form
    {
        private ICamera _camera;
        private DrawingImageProvider _imageProvider;
        private MediaConnector _connector;

        #region Initialize manipulation and filter
        private ImageManipulation _manipulation;
        private OzBrightnessCorrection _filter;
        #endregion

        public MainForm()
        {
            InitializeComponent();

            _connector = new MediaConnector();
            _imageProvider = new DrawingImageProvider();
            // Create video viewer UI control

            // Bind the camera image to the UI control
            videoViewer.SetImageProvider(_imageProvider);

            _manipulation = new ImageManipulation();
            _manipulation.Start();

            _filter = new OzBrightnessCorrection();
        }

        private void btn_Connect_Click(object sender, EventArgs e)
        {
            _camera = new WebCamera();

            if (_camera == null) return;

            _connector.Connect(_camera.VideoChannel, _manipulation);
            _connector.Connect(_manipulation, _imageProvider);

            _camera.Start();
            videoViewer.Start();
        }

        private void btn_Add_Click(object sender, EventArgs e)
        {
            _manipulation.Add(_filter);
        }

        private void btn_Remove_Click(object sender, EventArgs e)
        {
            _manipulation.Remove(_filter);
        }

        private void value_Scroll(object sender, EventArgs e)
        {
            var trackBar = sender as TrackBar;
            if (trackBar != null)
            {
                var value = trackBar.Value;
                _filter.AdjustValue = value;
                lb_Adjust.Text = @"Value: " + value;
            }
        }
    }
}
GUI
Windows forms version
MainForm.Designer.cs
			namespace ImageManipulation_WF
{
    partial class MainForm
    {
        ///
        /// Required designer variable.
        ///
        private System.ComponentModel.IContainer components = null;

        ///
        /// Clean up any resources being used.
        ///
        /// true if managed resources should be disposed; otherwise, false.
        protected override void Dispose(bool disposing)
        {
            if (disposing && (components != null))
            {
                components.Dispose();
            }
            base.Dispose(disposing);
        }

        #region Windows Form Designer generated code

        ///
        /// Required method for Designer support - do not modify
        /// the contents of this method with the code editor.
        ///
        private void InitializeComponent()
        {
            this.videoViewer = new Ozeki.Media.VideoViewerWF();
            this.btn_Connect = new System.Windows.Forms.Button();
            this.btn_Remove = new System.Windows.Forms.Button();
            this.btn_Add = new System.Windows.Forms.Button();
            this.lb_Adjust = new System.Windows.Forms.Label();
            this.trackBar = new System.Windows.Forms.TrackBar();
            ((System.ComponentModel.ISupportInitialize)(this.trackBar)).BeginInit();
            this.SuspendLayout();
            //
            // videoViewer
            //
            this.videoViewer.BackColor = System.Drawing.Color.Black;
            this.videoViewer.FlipMode = Ozeki.Media.FlipMode.None;
            this.videoViewer.FrameStretch = Ozeki.Media.FrameStretch.Uniform;
            this.videoViewer.FullScreenEnabled = true;
            this.videoViewer.Location = new System.Drawing.Point(12, 57);
            this.videoViewer.Name = "videoViewer";
            this.videoViewer.RotateAngle = 0;
            this.videoViewer.Size = new System.Drawing.Size(471, 334);
            this.videoViewer.TabIndex = 0;
            this.videoViewer.Text = "videoViewerWF1";
            //
            // btn_Connect
            //
            this.btn_Connect.Location = new System.Drawing.Point(12, 12);
            this.btn_Connect.Name = "btn_Connect";
            this.btn_Connect.Size = new System.Drawing.Size(152, 26);
            this.btn_Connect.TabIndex = 14;
            this.btn_Connect.Text = "Connect to WebCamera";
            this.btn_Connect.UseVisualStyleBackColor = true;
            this.btn_Connect.Click += new System.EventHandler(this.btn_Connect_Click);
            //
            // btn_Remove
            //
            this.btn_Remove.Location = new System.Drawing.Point(104, 475);
            this.btn_Remove.Name = "btn_Remove";
            this.btn_Remove.Size = new System.Drawing.Size(75, 23);
            this.btn_Remove.TabIndex = 1;
            this.btn_Remove.Text = "Remove";
            this.btn_Remove.UseVisualStyleBackColor = true;
            this.btn_Remove.Click += new System.EventHandler(this.btn_Remove_Click);
            //
            // btn_Add
            //
            this.btn_Add.Location = new System.Drawing.Point(23, 475);
            this.btn_Add.Name = "btn_Add";
            this.btn_Add.Size = new System.Drawing.Size(75, 23);
            this.btn_Add.TabIndex = 0;
            this.btn_Add.Text = "Add";
            this.btn_Add.UseVisualStyleBackColor = true;
            this.btn_Add.Click += new System.EventHandler(this.btn_Add_Click);
            //
            // lb_Adjust
            //
            this.lb_Adjust.AutoSize = true;
            this.lb_Adjust.Location = new System.Drawing.Point(20, 423);
            this.lb_Adjust.Name = "lb_Adjust";
            this.lb_Adjust.Size = new System.Drawing.Size(37, 13);
            this.lb_Adjust.TabIndex = 15;
            this.lb_Adjust.Text = "Value:";
            //
            // trackBar
            //
            this.trackBar.Location = new System.Drawing.Point(104, 423);
            this.trackBar.Maximum = 255;
            this.trackBar.Minimum = -255;
            this.trackBar.Name = "trackBar";
            this.trackBar.Size = new System.Drawing.Size(379, 45);
            this.trackBar.TabIndex = 16;
            this.trackBar.Scroll += new System.EventHandler(this.value_Scroll);
            //
            // MainForm
            //
            this.AutoScaleDimensions = new System.Drawing.SizeF(6F, 13F);
            this.AutoScaleMode = System.Windows.Forms.AutoScaleMode.Font;
            this.ClientSize = new System.Drawing.Size(498, 520);
            this.Controls.Add(this.trackBar);
            this.Controls.Add(this.lb_Adjust);
            this.Controls.Add(this.btn_Remove);
            this.Controls.Add(this.btn_Add);
            this.Controls.Add(this.btn_Connect);
            this.Controls.Add(this.videoViewer);
            this.Name = "MainForm";
            this.Text = "Brightness correction settings";
            ((System.ComponentModel.ISupportInitialize)(this.trackBar)).EndInit();
            this.ResumeLayout(false);
            this.PerformLayout();

        }

        #endregion

        private Ozeki.Media.VideoViewerWF videoViewer;
        private System.Windows.Forms.Button btn_Connect;
        private System.Windows.Forms.Button btn_Remove;
        private System.Windows.Forms.Button btn_Add;
        private System.Windows.Forms.Label lb_Adjust;
        private System.Windows.Forms.TrackBar trackBar;
    }
}
Related Pages
Conclusion
With the help of this lecture you can successfully implement brightness correction with your C# camera application using the Ozeki Camera SDK.
FAQ
Below you can find the answers for the most frequently asked questions related to this topic:
-
What kind of developer environment is needed?
- Microsoft Visual Studio 2010
- Microsoft .Net Framework 4.0
- Internet connection
-
How can I get the URL of the camera?
You can get the URL from the producer of the camera.
-
I have not managed to build the solution. How to solve it?
- Please set the Target framework property of the project to .NET 4.0.
- You should add the OzekiSDK.dll to the references of the solution.
- Please import the missing classes.
